![[SnapEvent]Android Google Map SDK的應用與注意事項](http://mis101bird.github.io/images/snapevent4.png)
本篇將接續前一篇得到的活動資料。目標為,實作會自動偵測使用者輸入,並顯示地點提示的搜尋框。在使用者按下搜尋框的提示後,畫面轉換到Map Activity並標記了剛剛選擇的提示地點,然後將之前得到的所有活動地點也顯示在Map上給使用者參考。
本篇使用Google Maps Android API第2版,基本的使用教學可以參考Tony的地圖與定位 1-3 (Maps and Positioning 1-3),我只記錄我在實作過程中,容易出錯的地方,還有大方向的開發流程。
1. API KEY
(1) 申請API key並啟用google map服務
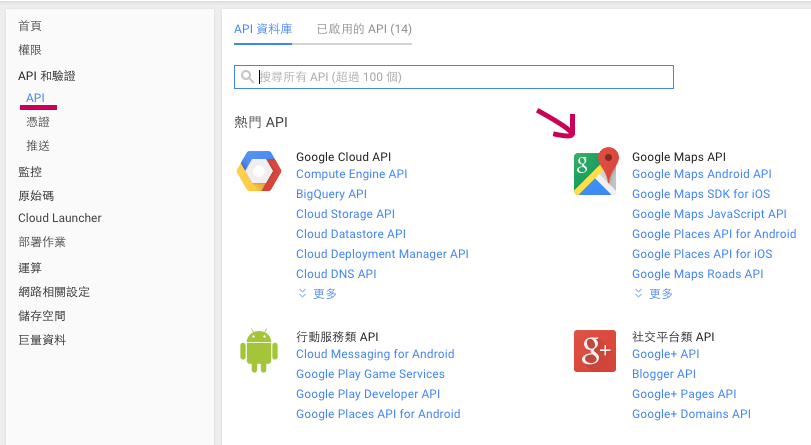
申請的網址可以參考這裡,申請完後別忘記為你的應用程式啟用需要的API,如果沒有如下圖一樣啟用Google map APIs,在Android呼叫時service會沒有回應。

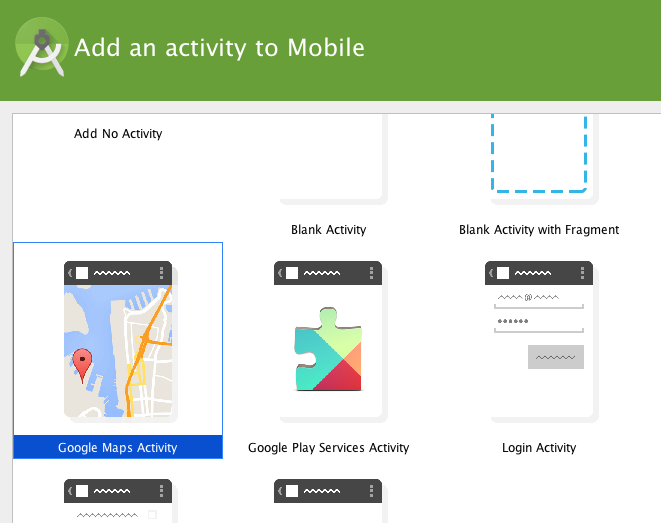
如果一開始就確定會用到Google map SDK,建議剛開始建立專案時就選擇Google Map Activity,就不用再打理麻煩的權限設定等…只要引入API key就好了,如下圖。
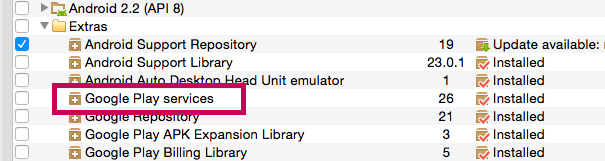
(2) 別忘記下載Google Play Service SDK
Google Map API為裡面的一部分。其實就算你沒有下載,gradle也會自動提醒你,這就是自動化工具的好處之一。
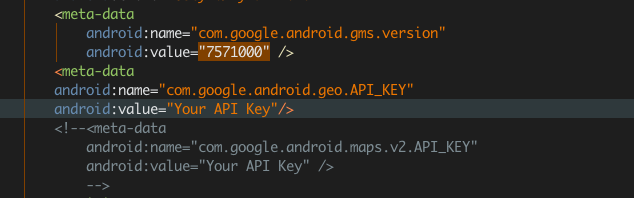
(3) 放置API Key的地方
將google map API key放到AndroidManifest.xml,你可能會注意到有2種Key的宣告,分別是com.google.android.maps.v2.API_KEY和com.google.android.geo.API_KEY。那要用哪一種?其實二種key的值都一樣,而com.google.android.maps.v2.API_KEY只有提供Map API service,com.google.android.geo.API_KEY則是Map API service和Place API service都有提供,考量到2個API key不能同時宣告,強烈推薦直接使用com.google.android.geo.API_KEY。
2. 第一步:AutoCompleteTextView與Google Place的結合
思路
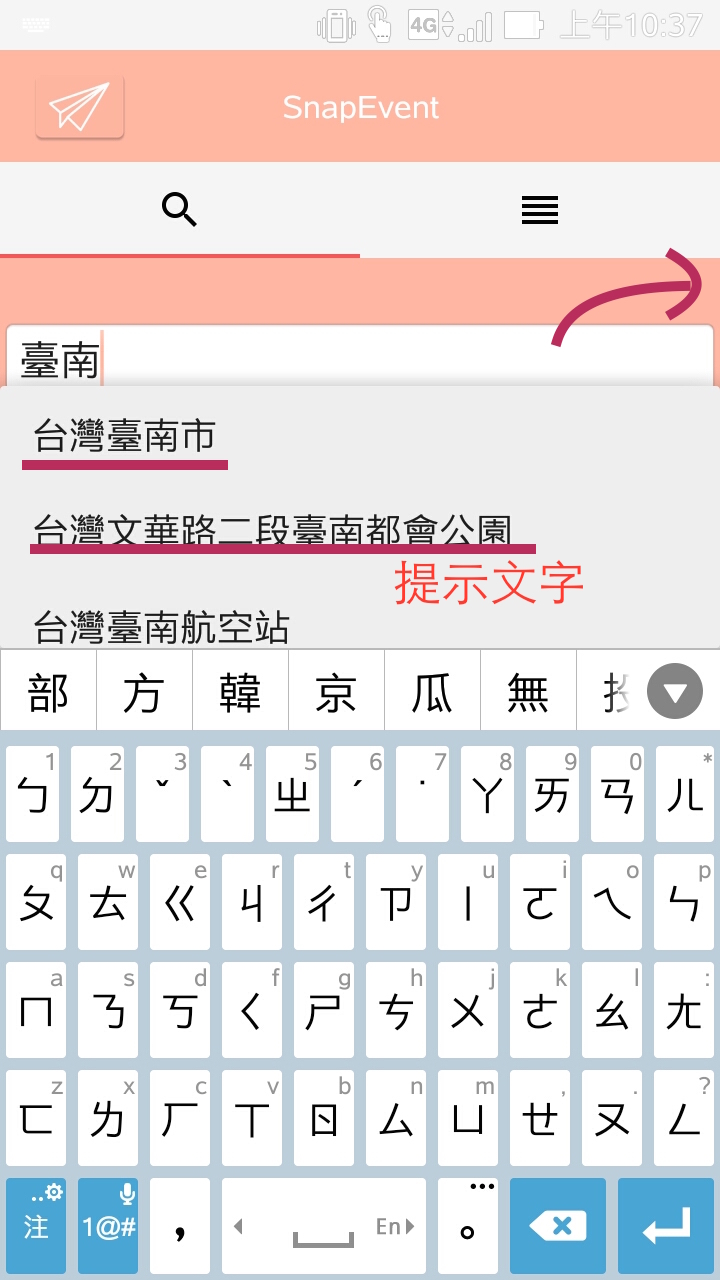
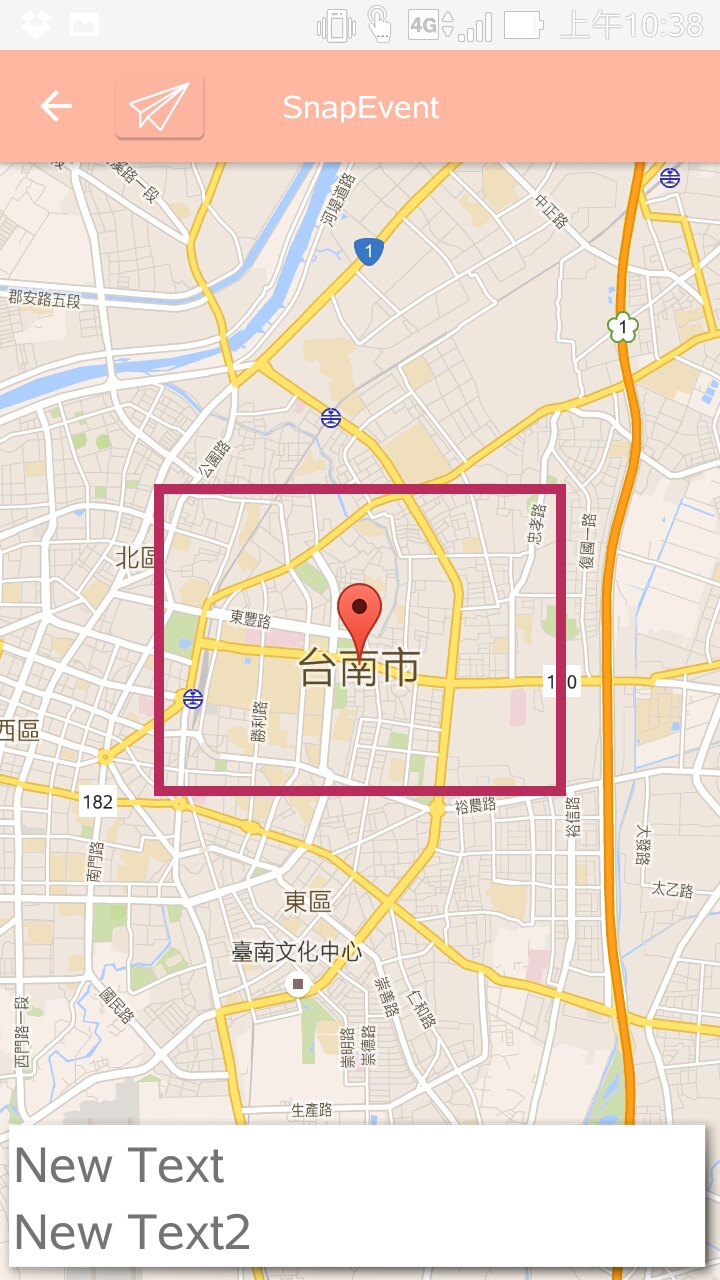
使用AutoCompleteTextView元件,讓使用者在輸入地方資訊時,自動根據使用者輸入的內容提供地點提示讓使用者選擇。並在使用者選擇地點後,將之引導到標註了剛剛搜尋的地點的Map Activity,如下圖。
(1) Google官方範例參考:android-play-places的PlaceComplete專案
(2) AutoCompleteTextView元件使用介紹
AutoCompleteTextView實際上就是TextView的一種,只是他多增加一種功能,會根據使用者輸入的內容提供選項讓使用者選擇。增加提示的方法和填充ListView內文的方法相同,為它設置一個Adapter,裡面封裝了要提供給AutoCompleteTextView的提示文字即可,下面做個最簡單的java code示範,AutoCompleteTextView是Android SDK內建的View元件,可以在xml佈局時直接從UI Design mode內拖拉。
public class AutoCompleteTextViewActivity extends Activity {

    String[] samples = new String[] { "One", "Two", "Three", "Four"};

    @Override
    public void onCreate(Bundle savedInstanceState) {
        super.onCreate(savedInstanceState);
        setContentView(R.layout.autocompletetextview);

        ArrayAdapter<String> aa = new ArrayAdapter<String>(this,
                android.R.layout.simple_dropdown_item_1line, samples);  //建立Adapter
        AutoCompleteTextView actv = (AutoCompleteTextView) findViewById(R.id.auto); //得到View物件
        actv.setAdapter(aa);  //設置Adapter
    }
}
其中的ArrayAdapter,有實作Filterable interface。Filterable interface的功能是用來,從現有的全部結果中,依照你輸入的字元,過濾出符合的結果。而AutoCompleteTextView,則只單純地列出Filterable所傳回的結果。例如,當你輸入個B字元時,AutoCompleteTextView就藉由Filterable的函式,列出只有B開頭的國家。
(3) Google Example code提供的PlaceAutocompleteAdapter.java
PlaceAutocompleteAdapter繼承了ArrayAdapter,並實作了Filterable的Filter method,回傳的Filter功能是把使用者輸入的關鍵字,丟到Google Map service搜尋符合的結果,再將結果傳回來顯示在AutoCompleteTextView的列表提示,下面只截取重要PlaceAutocompleteAdapter.java的Filterable實作部分。
@Override
    public Filter getFilter() {
        Filter filter = new Filter() {
            @Override
            protected FilterResults performFiltering(CharSequence constraint) { //實作過濾功能
                FilterResults results = new FilterResults();
                // 如果AutoCompleteTextView內無輸入任合內容則略過過濾
                if (constraint != null) {
                    // 由讀者輸入的關鍵字constraint尋找提示
                    mResultList = getAutocomplete(constraint);
                    if (mResultList != null) { //如果結果回傳成功
                        results.values = mResultList;
                        results.count = mResultList.size();
                    }
                }
                return results;
            }

            @Override
            protected void publishResults(CharSequence constraint, FilterResults results) {
                if (results != null && results.count > 0) {
                    // 回傳的提示至少一個以上才會通知更新
                    notifyDataSetChanged();
                } else {
                    notifyDataSetInvalidated();
                }
            }
        };
        return filter;
    }
讓我們來看看getAutocomplete(CharSequence constaint)裡,如何使用Google Map Places service補充AutoCompleteTextView的提示。
   private ArrayList<PlaceAutocomplete> getAutocomplete(CharSequence constraint) {
        if (mGoogleApiClient.isConnected()) {
            Log.i(TAG, "Starting autocomplete query for: " + constraint);

            // 輸入使用者輸入的關鍵字,回傳的PendingResult為AutocompletePredictionBuffer物件的List,內為Google Map Places service搜尋的結果
            //mBounds為地點的搜索範圍(本App限台灣)
            PendingResult<AutocompletePredictionBuffer> results =
                    Places.GeoDataApi
                            .getAutocompletePredictions(mGoogleApiClient, constraint.toString(),
                                    mBounds, mPlaceFilter);

            // 等待回傳所有的地點結果,並最多等待60秒
            AutocompletePredictionBuffer autocompletePredictions = results
                    .await(60, TimeUnit.SECONDS);

            // 確認結果回傳成功,否則回傳null
            final Status status = autocompletePredictions.getStatus();
            if (!status.isSuccess()) {
                Toast.makeText(getContext(), "Error contacting API: " + status.toString(),
                        Toast.LENGTH_SHORT).show();
                Log.e(TAG,"Error getting autocomplete prediction API call. ");
                autocompletePredictions.release();
                return null;
            }

            Log.i(TAG, "Query completed Received .");

            //將結果的地點們(autocompletePredictions)轉移至ArrayList<PlaceAutocomplete>。
            Iterator<AutocompletePrediction> iterator = autocompletePredictions.iterator(); //得迭代器
            ArrayList resultList = new ArrayList<>(autocompletePredictions.getCount());
            while (iterator.hasNext()) {
                AutocompletePrediction prediction = iterator.next();

                // PlaceAutocomplete為beans,內只封裝地點的ID和Description
                resultList.add(new PlaceAutocomplete(prediction.getPlaceId(),
                        prediction.getDescription()));
            }

            // 要釋放AutocompletePredictionBuffer物件,以預防記憶體流失
            autocompletePredictions.release();

            return resultList;
        }
        Log.e(TAG, "Google API client is not connected for autocomplete query.");
        return null;
    }
上面提到的Place bean,PlaceAutocomplete我就不贅述了,各位可以在這裡看到源碼。
(4) 使用PlaceAutocompleteAdapter的AutoCompleteTextView
以下為引用PlaceAutocompleteAdapter的程式部分。
@Override
    public void onActivityCreated(Bundle savedInstanceState) {
        super.onActivityCreated(savedInstanceState);
        mAutocompleteView = (AutoCompleteTextView)
                getView().findViewById(R.id.autocomplete_places);

        mAutocompleteView.setOnItemClickListener(mAutocompleteClickListener); //按下提示後呼叫mAutocompleteClickListener
        mAdapter = new PlaceAutocompleteAdapter(getActivity(), android.R.layout.simple_list_item_1,
                mGoogleApiClient, BOUNDS_GREATER_SYDNEY, null); //實體化PlaceAutocompleteAdapter
        mAutocompleteView.setAdapter(mAdapter); //設定Adapter
    }
以下說明PlaceAutocompleteAdapter的各個參數。
* mGoogleApiClient: 初始化google map client(使用Google Map API皆需要)
GoogleApiClient mGoogleApiClient = new GoogleApiClient.Builder(getActivity())
                .enableAutoManage(getActivity(), 0 /* clientId */, this)
                .addApi(Places.GEO_DATA_API)
                .build(); //set google map client init
* BOUNDS_GREATER_SYDNEY: 限制地點提示的範圍為台灣本島
private static final LatLngBounds BOUNDS_GREATER_SYDNEY = new LatLngBounds(
            new LatLng(21.715956, 119.419628),new LatLng(25.371160, 122.138744)); //Taiwan scope
範圍的選擇如下,由左至右;下至上。
(5) 使用AutoCompleteTextView的setOnItemClickListener method達到開啟Map Activity的目的
private AdapterView.OnItemClickListener mAutocompleteClickListener
            = new AdapterView.OnItemClickListener() {
        @Override
        public void onItemClick(AdapterView<> parent, View view, int position, long id) {

            final PlaceAutocompleteAdapter.PlaceAutocomplete item = mAdapter.getItem(position);//拿到place bean
            final String placeId = String.valueOf(item.placeId);
            Log.i("Input place", "Autocomplete item selected: " + item.description);

            /*
             使用placeId當參數,像Places Geo Data API要求PlaceBuffer物件(位置詳細資訊)
              */
            PendingResult<PlaceBuffer> placeResult = Places.GeoDataApi
                    .getPlaceById(mGoogleApiClient, placeId);

            //當placeResult回傳結果後,呼叫mUpdatePlaceDetailsCallback method
            placeResult.setResultCallback(mUpdatePlaceDetailsCallback);
            Log.i("Input place", "Called getPlaceById to get Place details for " + item.placeId);
        }
    };
在mUpdatePlaceDetailsCallback method內,我們必須開啟新的Activity(Map Activity),並將位置資訊傳到新Activity,讓其地點標記在Map上。
private ResultCallback<PlaceBuffer> mUpdatePlaceDetailsCallback
            = new ResultCallback<PlaceBuffer>() {
        @Override
        public void onResult(PlaceBuffer places) {
            if (!places.getStatus().isSuccess()) { //如果回傳失敗
                Log.e("TAG", "Place query did not complete. Error: " + places.getStatus().toString());
                places.release(); //釋放PlaceBuffer,以預防記憶體流失
                return;
            }
            //第一個結果
            final Place place = places.get(0);

            Intent info = new Intent(getActivity() , MapsActivity.class); //Intent指向MapsActivity
            info.putExtra("latitude", place.getLatLng().latitude); //儲存緯度資料
            info.putExtra("longitude",place.getLatLng().longitude); //儲存經度資料
            info.putExtra("name",place.getName()); //儲存地點名稱
            Log.i("place",place.getLatLng().toString());
            getActivity().startActivity(info); //開啟新Activity

            places.release(); //釋放PlaceBuffer,以預防記憶體流失
        }
    };
這樣一整套思路就完成了!接下來將進入顯示活動標記。
##3. 第二步:標記剛剛的提示,並將多個活動位置顯示在Google Map上
(1) 標記前一個Activity所選擇的提示地點,並顯示在Map上
   Intent info = getIntent();
   LatLng place = new LatLng(info.getDoubleExtra("latitude", 0), info.getDoubleExtra("longitude", 0));
   String name = info.getStringExtra("name"));
   mMap.addMarker(new MarkerOptions().position(place).title(name)).showInfoWindow(); //在Mapp加入marker
   mMap.moveCamera(CameraUpdateFactory.newLatLngZoom(place, 15.0f)); //移動Map鏡頭,關注在marker所在地,縮放程度為15f
   CameraUpdate zoom = CameraUpdateFactory.zoomTo(14f); //縮放程度,此為主
   mMap.animateCamera(zoom, 1000, new GoogleMap.CancelableCallback() { //1000 is animate velocity
            @Override
            public void onFinish() { //鏡頭更新成功後
                Log.i("animateCamera", "onFinish");
                markers = getEventAddress();
                for (int i = 0; i < markers.size(); i++) {
                    new GeocoderTask().execute(markers.get(i)); //執行非同步,並傳入參數MarkerItem物件
                }
            }
            @Override
            public void onCancel() {
            }
        });
上面的getEventAddress()會將所有原來只有地址的活動,封裝成MarkerItem物件,MarkerItem內封裝活動的順序,地址和Address物件,MarkerItem bean就不在下面贅述,code可以在這裡觀看。
public List<MarkerItem> getEventAddress() {

        HashMap events = AppController.getInstance().getEventbeans();
        List<xmlEventBean> ev = (List<xmlEventBean>) events.get("KKTIX"); //拿到所有活動
        Log.i("getTimeANDplace", "1: " + ev.size());
        List<MarkerItem> address = new ArrayList<MarkerItem>();
        int i = 0;
        for (xmlEventBean e : ev) {

            //以下做切字,切出活動地點的地址,並加入List<MarkerItem>
            if (!e.getTitle().contains("測試")) {
                String[] arrays = e.getTimeANDplace().split("/ +");
                if (arrays.length >= 2 && !arrays[1].equals("無")) {
                    if (!arrays[1].contains(" ")) {
                        Log.i("getTimeANDplace:arrays", arrays[1]);
                        address.add(new MarkerItem(i, arrays[1], null));
                    } else {
                        String[] ans = arrays[1].split(" ");
                        if (ans.length >= 1) {
                            Log.i("getTimeANDplace:ans", ans[0]);
                            address.add(new MarkerItem(i, ans[0], null));
                        }
                    }
                }
            }
            i++;
        }
        Log.i("getTimeANDplace", "2: " + address.size());//因為上面做了篩選,數量會比1:時來的少
        return address;
    }
(2) 使用GeocoderTask extends AsyncTask執行非同步(多線程),實現“標注活動地點於地圖上”的工作
private class GeocoderTask extends AsyncTask<MarkerItem, Void, MarkerItem> {
@Override
protected MarkerItem doInBackground(MarkerItem... locationName) { //在另一個Thread處理(非同步處)
//實體化Geocoder物件,他有“從經緯度尋找地址”和“從地址尋找經緯度”這2個功能
Geocoder geocoder = new Geocoder(getBaseContext());
List<Address> addresses = null;
MarkerItem name = locationName[0]; //拿到MarkerItem物件
try {
// 使用MarkerItem物件所封裝的活動地址取得Address物件
// 並只取回傳結果的第一個Address物件放進MarkerItem物件
addresses = geocoder.getFromLocationName(name.getAddress(), 1);
if (addresses != null && addresses.size() >= 1) {
name.setPlaceItem(addresses.get(0));
}
} catch (IOException e) {
e.printStackTrace();
}
return name; 回傳MarkerItem物件至onPostExecute
}
@Override
protected void onPostExecute(MarkerItem addresses) { //回到UI Thread執行,不能放耗時操作
if (addresses == null || addresses.getPlaceItem() == null) {
Log.i("FindNoLocation", "on " + addresses.getAddress());
}
// 從傳入的MarkerItem取得Address物件
Address address = (Address) addresses.getPlaceItem();
// 如果Address不為空,實體化MarkerOptions,標記活動地點於map上
if (address != null) {
LatLng latLng = new LatLng(address.getLatitude(), address.getLongitude());
markerOptions = new MarkerOptions().icon(BitmapDescriptorFactory.fromResource(R.drawable.direction_down)); //指定客製化marker icon
markerOptions.position(latLng);
mMap.addMarker(markerOptions.title(addresses.getAddress())); //作為marker query之用
}
}
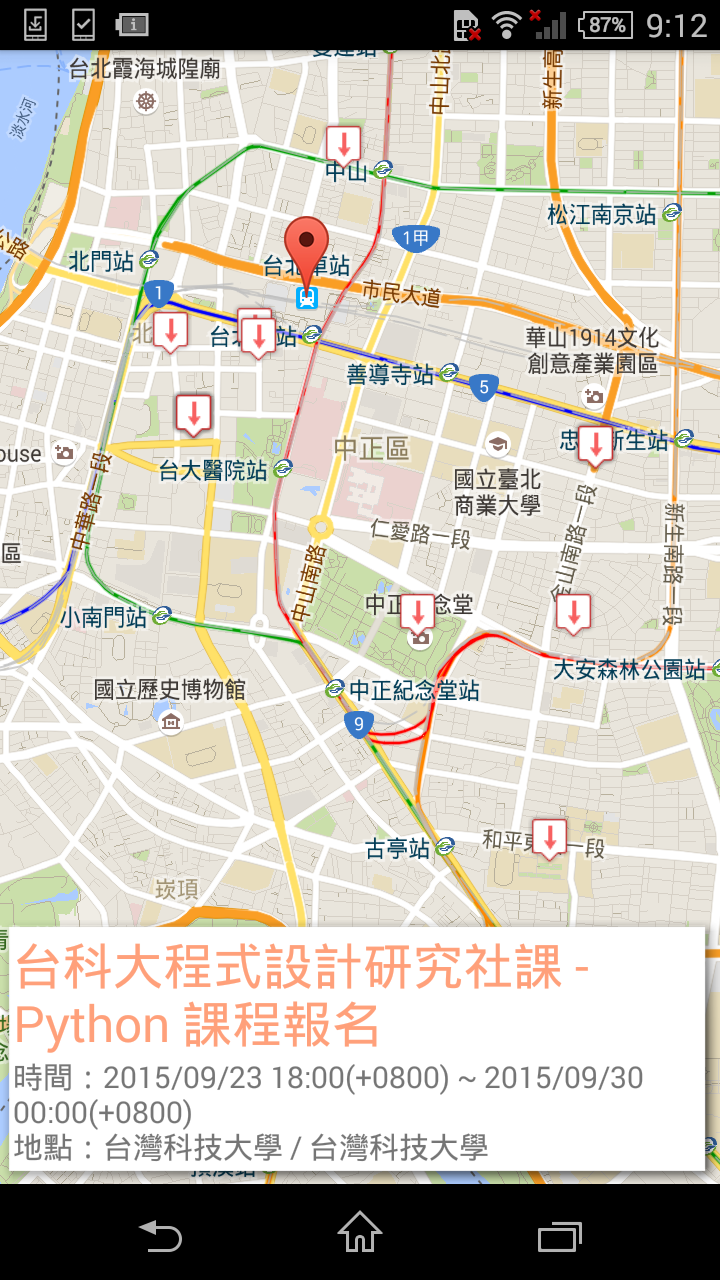
}從上面程式來看,為何要設定每個Marker的title?其實是為了之後OnMarkerClickListener所用,請看下面程式。
mMap.setOnMarkerClickListener(new GoogleMap.OnMarkerClickListener() {

            @Override
            public boolean onMarkerClick(Marker arg0) {

                if(markers !=null){
                    for (MarkerItem it : markers) {

                        //為了得知現在所選的Marker是哪個活動地點,一個個測試其活動地址是否符合
                        if (arg0.getTitle().equals(it.getAddress())) {

                            if(preClicked!=null){
                                preClicked.setIcon(BitmapDescriptorFactory.fromResource(R.drawable.direction_down));
                            }
                            Log.i("clickedIcon",it.getAddress());
                            arg0.setIcon(BitmapDescriptorFactory.fromResource(R.drawable.direction_down2));
                            if (markinfo.getVisibility()== View.GONE) {
                                markinfo.setVisibility(View.VISIBLE); //如果細節活動框不可見,則顯示細節框
                            }
                            //設定活動細節框內容
                            infotitle.setText(it.getBean().getTitle());
                            infodes.setText(it.getBean().getTimeANDplace());
                            preClicked=arg0;
                        }
                    }
                    return true;
                }else{
                    return false;
                }
            }
        });
以下,為以上活動標記實作成品。
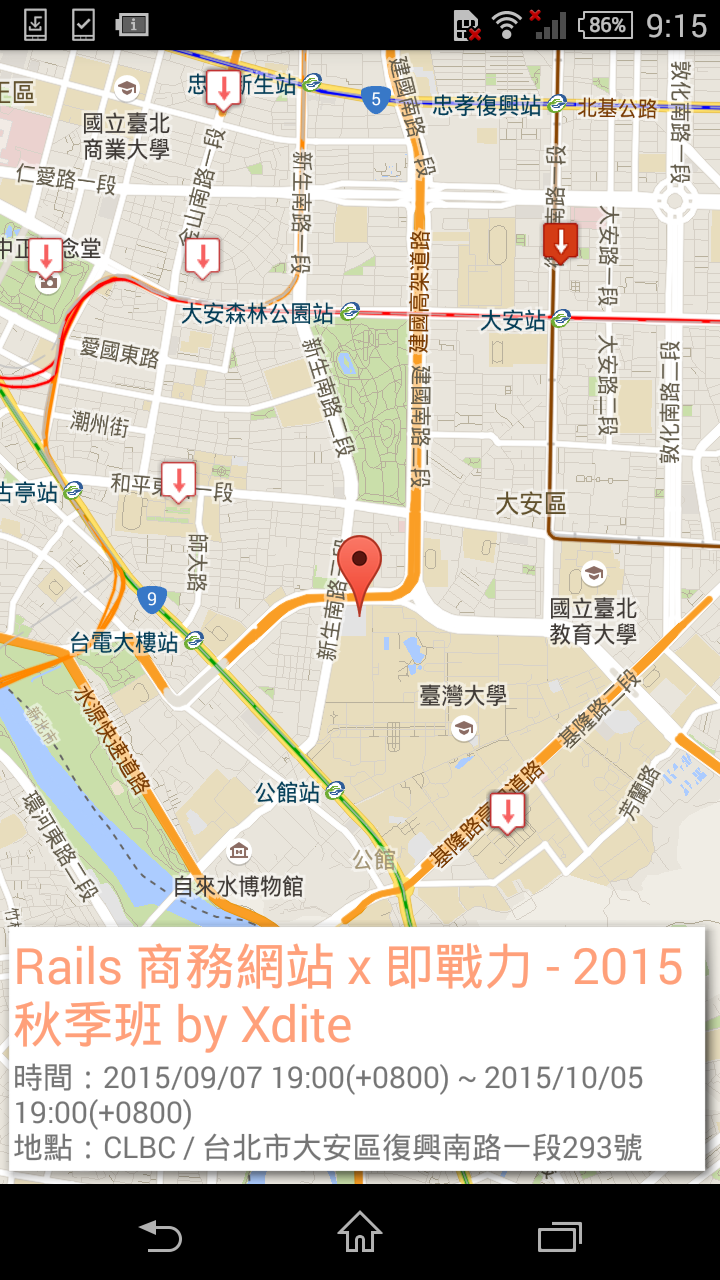
##4. project repo git clone下面專案到自己的電腦後,使用 git checkout e687 .。